When might you need multi-factor authentication? The website on CMS Joomla 4 consists of two parts - the frontend and the administrative panel. Authorization (user login) is possible on both the frontend and the admin panel. Authorization involves entering a username and password. But what if your login and password become known to a malicious actor? Especially since AI significantly simplifies the task of hacking passwords, even strong ones. This is where authentication comes in.
Authentication in Joomla 4 means verifying the authenticity of a user when logging into the website. Verification is done by entering a temporary code in an additional form, or other data depending on the chosen authentication method. Joomla version 4.2 and later offer several authentication methods, making it a multi-factor authentication (MFA).
You may also have come across the term "Two-factor authentication (2FA)" in relation to Joomla 4. This is because authentication in Joomla versions prior to 4.2 was called two-factor authentication and had some differences. Owners of websites on Joomla versions below 4.2 can update the CMS without fear of losing authentication settings, as they will be automatically transferred to the MFA settings. However, don't forget to make a backup before updating.
Here are 4 simple steps to make a backup using the Akeeba Backup component.
Authentication methods in Joomla 4:
- Code sent via email.
- Code generated by systems similar to Google Authenticator, Authy, and other similar ones;
- WC3 Web authentication through a browser using a password or biometric data (fingerprint, face scanning, etc.);
- YubiKey token (for Yubico company clients);
- Backup codes.
In addition to the standard authentication methods for Joomla 4, there are additional ones that can be configured using extensions. For example, SMS notifications.
To set up authentication in Joomla, you first need to enable the plugins for the authentication methods that you find convenient to use. Then activate these methods in the user settings.
Stage 1: Activation of authentication plugins
Multifactor authentication plugins practically do not contain any settings. All you need to do is enable them.
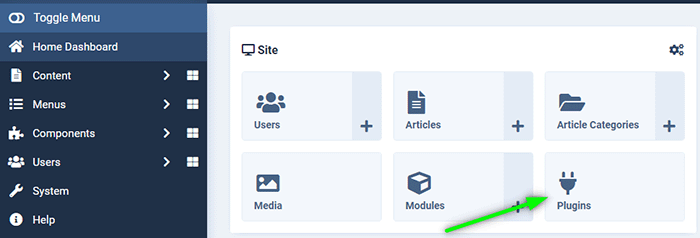
1) Go to the admin panel (website address/administrator - in the browser bar) and select Plugins:

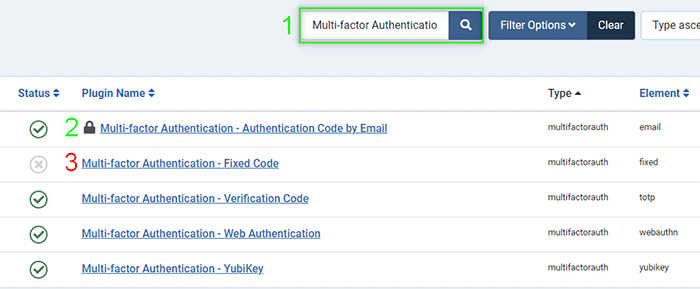
2) In the plugins section, you need to find multi-factor authentication plugins:

1. For the convenience of finding MFA plugins, use the plugin search by entering "Multi-factor Authentication."
2. If there is a lock icon next to the plugin name, click on the lock to unlock the plugin.
3. The "Multi-factor Authentication - Fixed Code" plugin is intended for developers and cannot be enabled on live websites. In the screenshot, this plugin is turned off, unlike the other authentication plugins. You can enable all other MFA-related plugins.
Configuring authentication plugins
Since the plugins do not have settings (except for the Authentication Code by Email), it is not necessary to open them. You can enable/disable them directly in the plugin list by clicking on the circle with a cross/checkmark to the left of the plugin name. The enabled plugin will have a green circle next to it.
Multi-factor Authentication - Authentication Code by Email - is an authentication plugin that, as the name suggests, will send a one-time code to the user's email. The plugin has only a couple of settings. Click on the plugin name to edit them.

1. Make email authentication mandatory for all users.
Unlike other plugins that require setup, including on the user's side, email authentication can be made mandatory for all users within the plugin itself.
Mandatory email authentication is an additional security option in case the user loses their primary authenticator. In this case, the user can request an alternative authentication method - via email - and the system will send a code to the email address specified in the user's settings.
This is a convenient option for site administrators with dozens or more users - email authentication can be enabled for all users with a single button.
2. The period of time during which the sent code will be valid. After two minutes, the code becomes inactive, and the system generates and sends a new code. Two minutes is the recommended period, but the period can be changed to be longer or shorter.
The plugin can be enabled in its settings by changing the state to "Enabled" (the button on the right). Also, don't forget to save the changes using the buttons at the top.
In our case, the plugin settings (mandatory for all users and time validity) remained unchanged, and their default values suit us. We simply enabled the plugin.
Stage 2: Activating authentication methods in user settings
Joomla 4 provides flexible settings for each user, including their permissions, notifications, language, and authentication. Therefore, authentication methods must be set up in the settings of each user (even if there is only one user). After all, some users may prefer to receive notifications via email, while others may prefer a code from Google Authenticator.
To do this, go to Users > Manage and you will land on the page showing all users. Click on the name of a specific user to edit their settings.
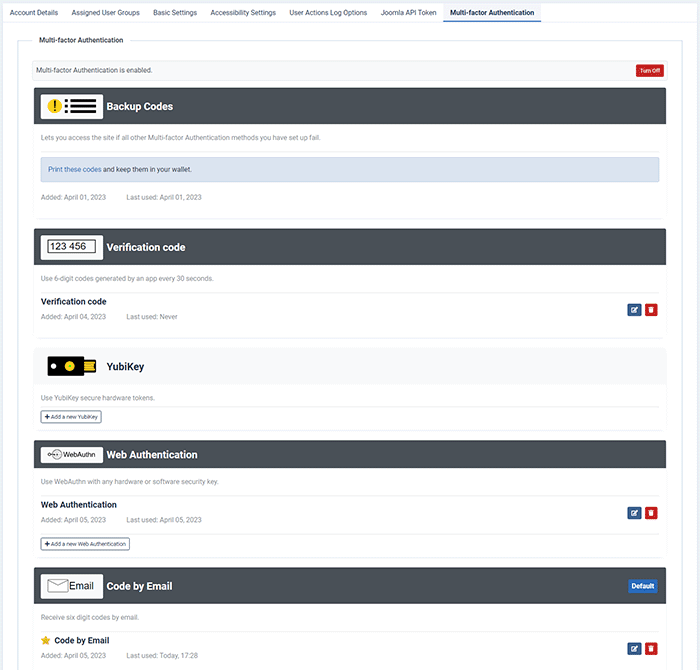
Go to the "Multi-factor Authentication" tab. To make this tab appear in the user's settings, at least one of the multi-factor authentication plugins (Stage 1) must be enabled.

On the website shown in the screenshot above, all 4 authentication plugins are enabled, and they are all displayed in the Multi-factor Authentication tab in the user settings. On your website, only the authentication methods whose plugins you have enabled will be displayed in the user authentication settings.
Also, another authentication method - Backup Codes - has been automatically added. Thus, Joomla 4.2 (or higher versions) now have 5 available authentication methods. We will consider the settings for each of them on the user side below.
Backup Codes

Click on the "Print these codes" link to open the backup code window.
Copy and save the codes for future authentication using this method. You can only use each of these codes once!
To generate new codes, click "Regenerate Backup Codes". Regenerating codes is recommended if you suspect that someone may have seen them or if you have run out of available backup codes.

This authentication method does not require additional activation, backup codes are automatically generated after enabling any authentication plugins. It is rather an additional method to use in case you are unable to use your preferred authentication method.
Verification code
This method sends a six-digit code to your application every 30 seconds.
You can use applications such as Google Authenticator, Authy, LastPass Authenticator, etc.
You can also use a password manager such as 1Password, BitWarden, Keeper, KeePassXC, Strongbox, etc.
In some cases, it may be possible to use a browser (such as Safari).
To activate, click on "Add a new Verification code."

It is necessary to generate a six-digit code for the first time to activate this authentication method. Depending on the method you have chosen, you can perform one of the following actions to generate the code:
- Use a key (Enter this key),
- Scan a QR code,
- Use the browser settings.
Your password manager application or browser will provide you with a six-digit code that you must enter into the field below (Enter the six digit verification code). Then click the Save and Close button.

For example, let's use the Google Authenticator app.
Open Google Authenticator on your smartphone.
-
In the lower right corner, click on the cross, select QR code scanning, and point the camera at the QR code on the settings page.
-
Once the app scans the QR code, you will receive a six-digit code. Its expiration time is indicated by a blue circle on the right and expires in 30 seconds. After that, Google Authenticator generates a new code.

In the future, when authenticating using this method, you will receive a 6-digit code in a similar way, which you will need to enter into an additional form after entering your login and password.
YubiKey
Authentication method based on YubiKey tokens. This method is suitable for Yubico company clients. You can find out about the company's service cost on their website https://www.yubico.com/.
This method has very simple settings. Click the Add a new YubiKey button.

Enter the code generated in the YubiKey in the field below and click Save and Close.

Web Authentication (WebAuthn)
WebAuthn is a secure and convenient way of authentication that doesn't require entering additional codes.
To confirm login, an authenticator is needed - an access key that is located on a physical or virtual device (USB, Bluetooth, or NFC). The authenticator can be the device itself (running on Android or iOS), which allows login via fingerprint or face scanning.
To use WebAuthn on your website, the HTTPS protocol is mandatory. WebAuthn, working through HTTPS, uses strong public-key cryptography. This allows your website to securely transmit data, similar to how banks and payment systems transmit data.
Setup
To set up Web Authentication, you need to log in to the admin panel from the device you plan to use. Different operating systems will behave differently.
Regardless of the device, the path to authentication settings remains the same: go to the Users section, select a specific user, click on their name to edit settings, go to the Multi-factor Authentication tab. Look for Web Authentication settings on this tab and click the "Add a new Web Authentication" button.

Above the "Add a new Web Authentication" button, you will see previously added devices or keys, each of which you can edit or delete using the buttons on the right.
Next, all you need to do is click the "Register your Authenticator" button and follow the further instructions depending on your system.

Windows will prompt you to insert a USB key.
Android and iOS will offer you to choose one of the following methods:
- fingerprint scan,
- facial recognition,
- unlocking the keyboard with another method installed on your device.
Code by Email
Authentication using a code sent to the user's email is a simple method that does not require additional keys or applications. Everyone has an email. Joomla site users definitely have an email, as it is not possible to register a user without an email. All you need to do is confirm the email in the user settings, in the same Multi-factor Authentication tab.

After clicking on the "Add a new Code by Email" button, you will be directed to the settings page, and the system will immediately send a six-digit code to the user's email. In the settings, you need to enter these six digits into the field at the bottom and save the changes (Save and close):

When authenticating using email in the future, you will receive similar messages with a 6-digit code that must be entered into an additional field when logging in.
We have reviewed the settings of all five authentication methods on the user side.
Default authentication method selection
The authentication method selected by default will be offered to you first when logging into the admin panel. Choose the most convenient method for you. If desired, you can choose an alternative authentication method from those previously configured when logging in.
On the user side, open the settings of the preferred authentication method and check the box "Make this the default Multi-factor Authentication method," and then save the changes. Such a checkbox is available in the settings of each method.
For example, the preferred method should be set to Code via Email. Click on the blue edit icon to do this.

Check "Make this the default Multi-factor Authentication method", click Save and close:

You will also find similar checkboxes in the settings of other authentication methods (except Backup Codes, which is an additional method).
How authentication works using the Code by Email method:
You can log in on the front-end of the website, but not all websites have authorization set up on the front-end, as this functionality is often unnecessary. Therefore, we will consider the example of logging into the admin panel.
1. You log in as usual by entering your username and password.

2. The authentication form appears. In our case, this is authentication with an email code, since we chose Code by Email as the default method.

In this field, you need to enter a 6-digit code that the system sent to the email address (specified in the user settings) and click on "Validate". That's it! You have passed authentication and are granted access to the admin panel.
The email code remains valid for 2 minutes, so you need to enter the code within the designated time. If you enter the code later, you will see an error message, and the system will generate and send a new code.
You can also switch to an alternative authentication method. To do this, click "Select a different method". You will have access to the methods that you previously configured.

Choose the method you want to use for authentication and click on its name, following the further instructions of the selected method.
Multifactor authentication is a simple but effective way to improve the security of your Joomla 4 website. The settings do not require much time. The CMS provides a wide selection of authentication methods, so you can choose the most convenient methods for you.


